Monday, June 30, 2008

MUFFIN TIN MONDAY

I absolutely loved this idea from Sycamore Stirring's blogspot. I don't have children at home anymore, but with my adorable grandchildren and grandnieces still at the appropriate age, I could hardly wait to share it.

The basic idea is that children eat much better when their food is served in an unusual manner, which I've certainly found to be true. I'm remembering banana flowers, sandwiches cut and decorated to look like faces, and bread snakes. (I'd cut the crusts off the peanut butter sandwiches, and say, "Oooh. Bread snakes! Scary." Worked every time. Sometimes the kids even ate the "snakes" before the sandwich itself!)

So Muffin Tin Monday=Lunch served in a muffin tin. Too cute!

Here's a photo, and the link:


Muffin Tin Monday

Friday, June 27, 2008

NEW FROM THE CHINA BLOSSOM GARDEN

It's amazing to me how many people will walk up to this


China Blossoms

and say, "Oh, look! She makes those little cup and saucer bird feeders." That just kind of leaves me shaking my head, because a: There aren't any cups, and b: These are flowers, held vertically on a stem, and won't hold anything. How is that going to work?

But I also began to think, Well, maybe they're seeing bird feeders because they want bird feeders, and not just because they expect them.

That kind of thinking can be dangerous, because it can lead to new ideas and then you have to act on them, and before you know it you're out in your shop making something you've never made before. Like flowers that can convert to bird feeders:


China Birdfeeders

Now, there are good reasons not to make the little bird feeders. First of all, around here it rains a lot, and these don't have covers, so after a rain shower, the bird seed can be kind of nasty. Second, if you're making a bird feeder, you have to use something in the center of the saucer that will actually hold something, and I like to mix it up, creating flowers of whatever looks good and ignoring functionality. Third, we also get freezing weather here, and any time you have an item made of layers of glass, it's going to hold rainwater, possibly in little crevices between the pieces. When the water freezes, it will expand, and if it's in one of those crevices, your garden art will be a shattered piece of garden junk.

This permutation, I think, takes care of all of that. I'll keep making China Blossoms that aren't anything else, and add these. In the summer, they can be set horizontally and hold water or seed for birds, or a votive candle to make a little fairy light outside. In the winter, when you still want to see something pretty in the garden, but don't want to risk breakage, you can leave them out, but set them on their stems vertically, so they won't hold water.

I'm pretty pleased with myself. And watching my little puppy sniff at the dress that just came from eBay. I'm curious, too: Will it fit? It came just in time for the 94 degree weather we're expecting this weekend, short, sleeveless, and black and white polka dots. Yay!

Tuesday, June 24, 2008

ENJOYING THE YARD

When we bought this place, the grass was literally knee-high, the flower beds full of weeds, and what should have been thick with lush vegetation was nearly barren, while what should have been spare was overgrown. Still, the yard had potential. What a playground for a plant lover mike myself--half an acre to landscape. DH and I, over time, began to have a vision for our property.

It's been seven years, and I've planted more every year, with some failures, and some remarkable successes. Plants I loved died, like the euphorbia griffithii


Euphorbia Griffithi "Fireglow"

and plants I don't like at all have run rampant, despite my best efforts to dig them up, weed them out, such as the weird one that has leaves shaped like caladium, without the veining, that goes from a leafy ground cover to something that looks like a candlestick made out of orange berries. They are not attractive, and they seem to be everywhere.

But oh, it does look like we're making progress, and this time of year I look outside and sigh for the wonder of it. I took a few pictures today, mostly of the foxgloves, which self-sow so freely, and flourish with no attention at all. Look at this one that found itself growing at the base of a dry (it leaks all the water out) birdbath:


And look at these! The arbor is over my head (I'm 5'6") by quite a bit, and if you look closely, you'll see that one foxglove has grown up through arbor, clematis vine, and is getting ready to bloom above it all.


This is taken from alongside those same foxgloves, looking in the direction of the swing, with its covering of wisteria, which still hasn't bloomed, ever:


And a last shot, of the Canterbury Bells Connie planted last year, and didn't tell me, and so I didn't know they were even there, until they burst into bloom late last week.


I'm beginning to love this yard, even when I have to get out the lawn mower, or maybe especially when I have to get the lawn mower. It gets to e more beautiful every year.

Friday, June 20, 2008

MATERNITY (TO) EMPIRE

It's hard to resist a twenty-five cent t-shirt, at least for me. I didn't resist this one, in spite of the fact that it was a maternity top. I wanted to see how hard it would be to turn it into an empire-waisted top. It was pretty easy, so I'm sharing the process.

Start with:


A Maternity T-shirt


You'll also need a fabric belt. I've used one that loops through chrome rings, but a buckle style would work as well, or even ribbon, tied in a bow.
Split the sides. Don't worry about picking the stitching out to do that. Just cut the seam, but make the cut on the front side of the seam, because the next thing you're going to do is get rid of the extra width in the back of the shirt, which will cut the old seam off at the same time.


Cut away the extra back width

Now measure your own back width, at the point just under your breasts. You want the back of the shirt to be the same width you are, so you'll do a little shaping now. Fold the back of the tee in half lengthwise, and the tape with your own back width in half also, and put the folds together. That will center your back width on the back width of the shirt. Mark where the end of the tape falls, adding some for seam allowance, and cut a gentle curve in to that point.

There's a good reason for shaping the back: When you gather the front of the shirt, it will pull the extra fabric from the back forward, and the side seams, too.


Match center backs of tape and tee, and mark


Cut a curve in to the mark

Next step is to figure out how much belt you need, and whether you want the buckle to fall at center front, or to one side. If you want the buckle at the center, remember that you'll need less length for that end than for the other, because of the part that will loop through the buckle. Play with it. If, when you're done, you don't feel like it's "right" you can change it. I did!


Once you've cut your belt lengths, measure down from the armhole to the point just under your bust. On me, that was five inches. Lay your inside-out tee flat, front up, but lifted out of the way. Pin the ends of the belt to the back edge of the tee, with the top edge of the belt on the mark of the under-bust point. The right side of the buckle end should be face down on the shirt back, but the loop-through end should be face up, because when you thread it through the buckle, it will reverse itself.


Placing the belt

You're almost finished! Sew up the side seams, being careful not to stretch them out of shape.

Note: When you cut the extra fabric away at the back, the side seams became slightly different lengths, but shaping the back will have equalized them somewhat, and any additional difference can be eased as you pin and sew.

I'm a big fan of short cuts. One of those is what to do when you reach the hem. The long cut is to pick out the hem for an inch or so on front and back, sew the side seam, and then re-hem. I don't like to take the time, but I don't want raw edges showing either, so I turn the seam allowance back to the seam itself, in a triangle, and sew right down to the point. It looks like this:


Fold and sew to the point

From the outside, you see this:


No raw edges!

The last step is to tack the buckle of the belt in place, to keep it from drooping.

The neckline of the shirt I used was too high for me, and I had extra belting, so I cut the neck down and added this:


A triangle of trim

Here's the finished shirt!


Tuesday, June 17, 2008

QUICK CHIP FIX

I do a lot of assemblage art, much of it involving china, ceramics, or pottery. I take pleasure in the hours I spend combing through stacks of dishes and crockery at yard, garage, and estate sales, and thrift stores, but it can be hugely disappointing to get something home and realize I either missed seeing a chip or chipped it on the way home. Pffft! Just like that, a likely suspect for a piece of art becomes useless garbage and money thrown down a rat hole.

Or does it? Not always. Not always.

I've been getting Mega Blossoms put together for shows that are coming up this weekend and next. There are plates, bowls, votives, coasters, and other lovely bits stacked and scattered and layered all over my living room floor. Step one in making a Mega Blossom (well, step two, if you include finding and buying the pieces, or step three if you count unwrapping and washing them all) is to spread out the plates and platters I envision being the largest, back part of the Blossom. Then I start putting color-coordinated other pieces in the center, switching them from one plate to another, changing my mind more often than I change my twisted position--it's like a giant jigsaw puzzle with no picture on the box. What fun!

Well, I got one figured out yesterday and was set to glue it together when I realized the pretty golden oak leaf dish I'd chosen for the top element was chipped. Dang. But it's an "Oh, bother," dang, not an "Alas! Disaster!" dang.

I decided to share my remedy. In truth, there were several chipped items. I just picked them up and headed for my stash of acrylic paints. Most of the time, that's all you need. Paint. If you can match the color where the chip is, you're set. Dab on that bit of color, and the chip disappears.

Now, I'm not convinced you could eat dinner off a thus-repaired plate, put it through the dishwasher, and still have a disappeared chip, but I'm not convinced you couldn't either, because after you've let the paint dry, you're going to paint over it with clear varnish. I like Dura Clear, which I get at Michaels or Joann's. It dries nicely shiny, and that reflective quality disguises tiny differences between the color of your paint and the dish. And it's practically indestructible. I used it on a painted rock about ten years ago, set the rock outside, and it lasted a good seven years out in the weather before the paint even began to chip off.

But what if you can't match the paint on the chipped dish? That was the case with my oak leaf. Here's the Mega Blossom. (No stem holder on it yet, so I can't stand it upright.)


And here's a close-up of the "repaired" oak leaf. Look at the yellow-gold dots. If they're right on the edge, they're hiding a chip. Otherwise, they're just decoration, added to make it look like they're supposed to be there, not dots of paint hiding chips. That's the key: camouflage and deceive! (Well. Guess that just goes to show there are times you can actually take pride in deceptiveness. As my dad would have said, "Who'd of thunk it?!")


Saved by paint. Don't you just love the stuff?

Sunday, June 15, 2008

MORE NEW PEEPS

The Seeding Our Future Garden Tour and Art Show is coming up this coming weekend, at Tigard High School. I've been kind of scrambling to get things made, as I've sold more than usual, and didn't get as much as I should have done over the winter.

As part of that push, I created a little group of the Tea Kettle Characters, so of course I'm putting them in here!

A little guy I'm calling Blue Boy, at least for now:


A simple sort of fellow known as Ed:


Owen, with his lop-sided smile:


And April:


Friday, June 13, 2008

MY DREAM CAR

I have found it. My dream car. Look at it. Isn't it cute? This is a small version. They have sedans that seat five, too, but this is the one I want. Tata motors will be producing them, and they're slated to hit the market this year. Unfortunately, it appears that I'd have to go to India to get one, but it might be worth it. The least expensive model they're planning is only $4,800, a two-seater, which would be good as a run-around in town. With the cost of fuel what it is, I'd save the cost of the car, the vacation in a foreign land, and shipping it to the states, in about two years.


The OneCat

Appearance aside, since that's always been a secondary issue for me, with reliability and mileage being at the top of my priorities list, this car doesn't use gas at all. Zip. Nada. It uses almost no electricity. Fill its tanks with air (you heard me right) and you're good for about 500 miles, at speeds of up to 68 mph.

Air. The car runs on air! It does it by having a small electric motor that releases a spurt of compressed air into the piston chambers (there are 2, 4, and 6 cylinder versions) to turn the drive shaft, at the same time compressing some air back into the tanks. It can be refilled at gas stations, or plugged in at home, to fill itself with the built-in air compressor.

This is a car to love. Completely.

And think about parking. It appears to be about the same size as a Smart Car, which means you could park it at right angles to the curb, and it would fit that way, in about the space you'd need for opening the back hatch of a full-sized SUV.

Or heck, just tuck it into your purse and carry it into the store with you!

Wednesday, June 11, 2008

TWO SHIPPING TIPS

There are things I love, like creating my art, and the little thrill when someone else likes it enough to buy it.

Some things I don't love so much, like holding my breath, waiting to see if my packing job was good enough. Shipping glass...ooh, the tension, the worry.

I wrap everything in layers of bubble wrap, put styrofoam chunks between what I'm mailing and the wall of the box, slide my hands down the insides of the carton on all sides, making sure there's plenty of padding--anything, whatever it takes to make sure it arrives safely.

But I'm also aware that bubble wrap isn't exactly free, and that it's not exactly friendly to the environment. A friend who used to work in the shipping department of a china company once told me there was nothing as good as old clothes for wrapping dishes in to mail, but I've hesitated to use it. What would people think, finding their purchase wrapped in my old sweatshirt? Hmm.

I wrapped four Mega Blossoms to mail yesterday, and after they were bundled into the bubble wrap and put in the box, I was faced with a substantial amount of empty. What was I going to fill that with? I didn't want to use up all my bubble wrap, but nothing was more important than a safe trip for the Blossoms.

Isn't it great when a good idea lights up your brain? I have new packing material, free, and recycled.

Start with a stack of newspaper, and the plastic sleeve it came in. (That's for if you live in places like this, where it rains so much wrapping a morning-delivery paper in plastic is pretty much mandatory.) If you don't have those plastic sleeves, any airtight plastic bag will do, such as a produce bag from the grocery store.


The materials


Crumpled and stuffed

Crumple sheets of newspaper and stuff them into the bags. Tie a knot in the bag, which will trap air. Now you have newpaper that isn't going to shift around in the box, and won't get compressed because you've basically got a newspaper-stuffed balloon now.


Packed

I'll still wrap whatever article I'm shipping in bubble wrap to begin with, but I'm happy to know there's a cheap, green, way to provide the additional padding it needs.

The other tip isn't visual.

When I sell a China or Mega Blossom, a stem goes with it. I charge $8 to ship one Blossom and stem, which isn't as much as it actually costs. I'm afraid if I had to charge as much as it cost, nobody would even order one! Best case scenario for me is when someone orders more than one. I discount the second shipping to $5, and the combined shipping is now almost as much as what I'll pay, if you don't count the box and/or bubble wrap.

One of the reasons it's been so expensive is that the USPS nails you with a $4 surcharge for any package longer than 34 inches, and the stems are 35-36".

One day recently, the term "square the hypotenuse" popped into my head. (Lol, I love saying that, "Square the hypotenuse!") Yes, but what did that mean? Oh! Oh! Put the stems on a flat rectangle of cardboard, on the diagonal! How wide would the cardboard need to be, to bring the length of the package under that 34" limit?

Turns out you can get it down to 32" with a piece of cardboard 16" wide, and not only do you save the $4 surcharge, you can now send it Priority Mail for about what Parcel Post now costs. Before, not only could it not be sent Priority, but, a clerk at the post office confided, because it was an unusual size, it took even longer than the usual Parcel Post, up to ten days. Whoo-hoo! Two days instead of ten is GREAT.

Well, okay. My second tip probably isn't of much use to anyone but me, but I'm still very, very happy (and feel amazingly intelligent, lol) for having thought of it.

Time to get busy. My uncle is having brain surgery today. We've lost my dad, two friends, and a beloved aunt since mid-December. Mama is practically frantic, and is coming into town to spend the night, so we can visit Uncle Darrell in the hospital this evening and tomorrow. (I'm just repeating the mantra: He'll be okay. He'll be okay.) I have some serious housecleaning to do before Mama gets here. Culture shock is my neatnik Mama dropping in on an unprepared me!

Saturday, June 7, 2008

WHY IS IT THAT...?

No matter how old I get, or how many houses with porches I've been in, there is something about sweeping a porch, especially the steps, that makes me feel like a little girl playing house. I sing, like Cinderella in a Disney film. So far, though, my songs have not included, "Someday my prince will come, someday I'll find my love..."


Friday, June 6, 2008

AWWW...DOG MEETS KITTY

Ceili, our little Wheaton Scotty, just loves to go back and visit Connie, our neighbor across the back fence. She's one of our tenants, so her yard connects with ours, with a gate in-between.

Yesterday afternoon, Ceili was just kind of moping around (she misses DH a lot). She went from moping to whining, and I just couldn't figure out what was going on. She didn't want food. She didn't appear to need to go out. Finally, I said, "Do you want to go see Connie?" and she just about went nuts, jumping up and down, and racing from me to the door and back. So we went over.

Connie's brother was there with his kitten. The kitten, Ricky, is no fan of dogs, to put it mildly. She sat on Connie's lap and hissed and snarled her miniature fear and animosity while Ceili looked back with calm, curious, friendliness. Connie restrained the kitten, firmly, and reassured me. I was nervous. I didn't know if Ceili would bite the Ricky, but I was afraid the kitten would take a swipe at Ceili's nose. I needn't have worried.

Within a few minutes, Ceili had joined Ricky in Connie's lap. I got video:


Thursday, June 5, 2008

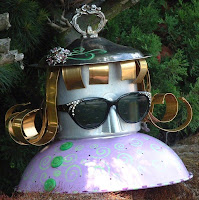
The Tea Fairy and The Ladybug Lady

Two new Tea Kettle Characters are done. I'm well pleased with both of them, and surprised and thrilled to see that they've already been featured on two webpages, after listing them in my etsy store last night. (Thanks to Always Amy and Cuteable! The articles they wrote are well worth reading, too. Visit them and learn good stuff you'll use.)

Anyway, here are The Tea Fairy, and Ladybug Lady:


Well, there's a floor to wax in the rental house, it's raining, so I'm off the hook for weeding the flower beds for now, need to go to the hardware store for drip pans for the rental's range, and drive over to Halsey to pick up the rents there. Haven't done a lick of housework yet, and I want to build a Coffee Pot Person today. oof. Time to get off my...uhm...stand myself up and get busy!

I WON SOMETHING!

Sunday was the Craft: Magazine release party, which was great fun, especially since I got to see Sister Diane ( DIY Alert, Crafty Pod), and work at one of several craft stations, and just generally soak up all the crafty energy in the room. (I do love creative people. sigh.)

AND they had several drawings for door prizes, and drew my name for one!

Let me see...the last time I won anything was, oh, twenty-five years ago. There was a sweepstakes in a magazine. Didn't figure there was any chance at all I'd win a top prize, but they said they were giving away 3,000 sun visors, and I thought it would be fun to win one for the kids, so I entered. I won a year's supply of Orange Crush soda pop! Imagine my bliss. Cases of a drink I never bought, and didn't much care for, bottles and bottles of a beverage too sweet and full of empty calories to give to my kids, except on very rare, very special occasions. Oh, goody. (Actually, I was pretty thrilled to have won one of the big ones, and we did eventually drink each and every bottle of the stuff.)

But the prize I won Sunday was a lot better than that. Here's what I won:


What a haul!


Here's a list of my happy-making take:

Folks, I feel like I made out like a bandit. Got all my goodies spread out on the dining table now, and just smile when I see them there.

Related Posts with Thumbnails