.JPG)


THE CRACKED POTS ARTIST CHALLENGE
Every year, several months before the show at Edgefield McMennamins, Cracked Pots issues a challenge to its member artists: Make art from the chosen recyclable materials. Last year the materials we were to use were Cd's and coat hangers. The year before that, small appliances, and (I think) garden hoses.
This year's challenge was to use lids, caps, and/or non-motorized tools, in any combination. I didn't enter, but seeing what the other artists had come up with was a must--it's always so amazing, what people can do with the most unexpected, unpromising of things. The entries this year were nothing short of spectacular.
It's a contest, with people, artists and show attendees alike, filling out a ballot with their favorite on it, but I didn't get to find out who won, so I'm just going to put up pictures of some, actually, most, of my favorites.

Whimsical birdhouses covered with smashed bottle caps

Fishes of cut mirror glass swim a river of rock and cork

Contrast--soft, matte cork and hard, shiny stone

A curtain of corks

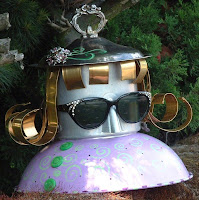
A Bulbous Band

Pickaxe heads connect towering wooden curves

Steel hand tools come together to make a musician who plays typewriter
I think the last one is my favorite, but I loved the pickaxe arch, too, and there was an office chair completely covered with smashed bottle caps that was 100% fun. I just don't know how anyone could vote for one favorite in the bunch.
What an amazing group of artists, to have come up with such wonderful art.
This year's challenge was to use lids, caps, and/or non-motorized tools, in any combination. I didn't enter, but seeing what the other artists had come up with was a must--it's always so amazing, what people can do with the most unexpected, unpromising of things. The entries this year were nothing short of spectacular.
It's a contest, with people, artists and show attendees alike, filling out a ballot with their favorite on it, but I didn't get to find out who won, so I'm just going to put up pictures of some, actually, most, of my favorites.
Whimsical birdhouses covered with smashed bottle caps
Fishes of cut mirror glass swim a river of rock and cork
Contrast--soft, matte cork and hard, shiny stone
A curtain of corks
A Bulbous Band
Pickaxe heads connect towering wooden curves
Steel hand tools come together to make a musician who plays typewriter
I think the last one is my favorite, but I loved the pickaxe arch, too, and there was an office chair completely covered with smashed bottle caps that was 100% fun. I just don't know how anyone could vote for one favorite in the bunch.
What an amazing group of artists, to have come up with such wonderful art.