Friday, July 18, 2008

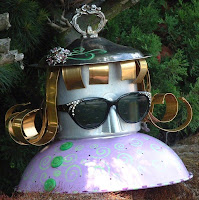
Tea Pots Are People, Too! (4 new peeps)

Well, we got back from the Lavender Daze Festival in Hood River on Wednesday, and I've been scrambling to catch up with everyday life and get ready for the Cracked Pots Garden Art Show at Edgefield ever since.

Yesterday, I got a little side-tracked, but it was SO worth it. My daughter spotted an ad on Craig's List for a an estate "sale" where everything was free. It was actually the leftovers from their real sale, but we had such fun going through things, and made some serious scores. I'm hoping to blog about that in the next day or so, and also about Lavender Daze, but in the meantime...

TA-DAH!! New Tea Kettle Characters!

Here are their pictures, group shot first:


A Happy Foursome


Bonita


Faith


Winston


Raoul

Wednesday, July 9, 2008

THE FIRST DROP

My daughter wrote this, and I thought it was lovely, so evocative of summer and childhood, and so full of nostalgia. She gave me her permission to share it.

The First Drop

I could still see the heat
shimmering waves on the pavement
I wouldn't have noticed but
the smell is unmistakable
Everything clean and perfect
It reminds me of home
of perfect outside summers
standing on the deck
to see thunder and lightening
of being eight again
barefoot, grubby, sticky
That smell is time to go home
paper dolls and coloring books
strawberry leather and homemade popsicles
inside games and a fort made of pillows


I want to know if it smells the same everywhere
I think not
Home is magical trees
with perfect rainbows stretching mountains
But, I wonder
does your rain smell like home?


Monday, July 7, 2008

SMALLTOWN, USA 4th OF JULY

We were in Manzanita, on the Oregon coast, for the 4th of July. They have, as many small towns do, a parade. If your experience of parades is what you get in a city or see on TV, it's easy for forget what small town celebrations are like. They're Real, with a capital "R".

I loved the inclusive feel of this parade. If you wanted to be in it, you were in it. Your float might be a bicycle with ribbons and streamers, but it was your float. Everyone was roundly applauded. Everyone, without exception--war veterans, aged and recently returned from Iraq, floats calling for peace, floats celebrating the Summer of Love, people on horseback, on foot, in costume, in cars, on the backs and tops of pickups, scooters, motorcycles, old beauty queens, babes in strollers--we whooped and hollered and clapped for all of them. It was great. I took a lot of photos, and rather than string them in a long, vertical, line, I'm going to try a slideshow.


And one video. This is the float our son created, with two of our grandkids on it. Son Jeff is driving the pickup, one grandson is standing in the pickup bed, and our granddaughter is the lovely throwing candy from The Black Squirrel. The float was made from cardboard Jeff salvaged from the work site of the house he and DH have been building. (The arm waving, and yelling you'll see and hear, are DH. Do you think maybe he's proud and happy?)


Photo Sharing - Video Sharing - Photo Printing - Photo Books

Thursday, July 3, 2008

MAKING CHINA BLOSSOMS

I made a bunch of China Blossoms the other day, and it hit me that I'd never taken any pictures of the process, so this time I did.

The procedure is this:

Cover whatever large surface is available with as many saucers or other small dishes or glassware as it will hold.
Bring out the votive holders, ashtrays, little dishes, small glasses, little bud vases, etc., that have been gathered over the past weeks or months, and put one, or sometimes two, in the center of each dish.

Change your mind eight times about which center piece goes with which saucer.

Then change it again.

When you've finally got it figured out (whew!) glue the pieces down.


Two tables full


On this day, I worked outside. It was pleasant to be in the yard, and the warmth of the sun made the glue I use set up faster. That's good, because this step also entails coming back to the table every few minutes to see what has slid off-center, and sliding it back into place.

The glue is not secret. I use E6000, which is the best I've found, after many trials, but takes quite a while to set up. You don't have a reliable bond for at least 24 hours, but once you've got it, there doesn't appear to be anything that will separate your glued pieces from each other.


Showing some of them close-up


Even when you think you're done with this part, you might not be. I added to some of the ones shown above, a colorful flat marble here and there, or some other oddment, often completes the flower.


Couple of Favorites


While the China Blossoms were drying, I took myself into my shop and set up my itty bitty chop saw, to cut the copper tubing. It gets cut into lengths, crimped flat on one end, and then I take it to a friend's house, where I do a combination of welding and soldering to complete the back assembly. We're working on getting the spot welder set up at my place, so I don't have to go away from home to do this.


Set up to cut the tubing


A completed back, which holds the China Blossom stem


The last step happens the next day (remember the 24 hour glue set-up time). I turn the China Blossoms on their faces, and glue the backs on. Some of them have to be set on bowls, because they aren't flat on the front. Sometimes the center piece has managed to slide off-center, in spite of my vigilance. Those I hold up and turn until they look like the piece is centered, then place the back accordingly. It's an optical illusion thing. After that, it's just a matter of sliding the stem holders back into place when they slide away from where I've put them. (I have a mechanical engineer friend who says they slide because, basically, a glob of glue constitutes a little hill. Anything set atop that hill is going to slide down it, until either the glue is sticky enough to hold it in place, or the hills has flattened itself out. Knowing that, I now aim for a flatter hill to begin with!)


And that's how you make a China Blossom!

Tuesday, July 1, 2008

WATER BOTTLE CRAFT

It's not exactly a secret: I hate to throw anything away. I do recycle as much as I can, but see it as just a greener way to discard something. I also have issues with buying water, especially since our water here is so good, but the recent heat, coupled with a two-day long outside show sent me to the store for a case of it. (Hint: Freeze at least half the water you plan to take. It will keep the other bottles cold, and melt as the day goes on, giving you lovely ice water to drink, and/or a cooling bottle to hold against wrists and neck.)

So, there I stood yesterday, with a cluster of empty water bottles on the kitchen counter. What to do? Why, make squids, or dangles, or whatever you want to call them! It's an easy craft for older kids or grown-ups who don't like to make garbage.

You need:


The Materials


  • Empty water bottles

  • Scissors

  • Small things to hang inside the bottle neck

  • Wire or string


Begin by making a long, spiral cut the length of the bottle, starting wherever you want. I began my cut just below the bell shape. My water bottle was quite thin and flexible, so to begin the cut, I just kind of squished the side flat. You might have to poke a starter hole in a sturdier bottle.

Here's the path my scissors took:


A Spiral Course

As you can see, the trick is to cut almost all the way around, and then angle your cut down. I pretty much followed the indentations around the bottle itself, including where there was a kind of wave pattern. (I thought it would look cool to "catch the waves", but it didn't actually show, so you can just do a plain spiral.) Go all the way to the bottom of the bottle, but don't cut the bottom off.

When you've finished your spiral, you'll have this:


Do that to three bottles, and nest the neck ends together in a stack, so that the curls hang from three different places.

Now take one of the little items you've gathered--a large bead, a key, a small toy, whatever you like that will fit inside the belled top of the bottle, but not go through the neck. If it has a hole in it, run a string or length of wire through. (I used wire, just because I knew where I had a good stash of different colors. It took about 18" (46 cm).) If there's no hole, just tie it around the piece.

Run the string or wire up through all three bottle necks. Your bright object will add a bit of color, and provide a stopper so you can hang the "squid" up.

When you have the string through the top neck, you can spread it to each side, and screw the top on. It's an option that doesn't affect anything. In fact, without the lid, you have transparency all the way up, which might be even better. But here's what I did:


Up, Through, and Down


Here's are close-ups of my bottles. I used an old Christmas ornament and a big red button.


Take your squid outside and hang it from a tree, or arbor. Or dangle it from something in your room. (I put a single, spiral-cut bottle up for the neighbor's kitten, and she loves it. It's very bouncy. The bottle. Not the kitten. Well, actually, both of them.)


Monday, June 30, 2008

MUFFIN TIN MONDAY

I absolutely loved this idea from Sycamore Stirring's blogspot. I don't have children at home anymore, but with my adorable grandchildren and grandnieces still at the appropriate age, I could hardly wait to share it.

The basic idea is that children eat much better when their food is served in an unusual manner, which I've certainly found to be true. I'm remembering banana flowers, sandwiches cut and decorated to look like faces, and bread snakes. (I'd cut the crusts off the peanut butter sandwiches, and say, "Oooh. Bread snakes! Scary." Worked every time. Sometimes the kids even ate the "snakes" before the sandwich itself!)

So Muffin Tin Monday=Lunch served in a muffin tin. Too cute!

Here's a photo, and the link:


Muffin Tin Monday

Friday, June 27, 2008

NEW FROM THE CHINA BLOSSOM GARDEN

It's amazing to me how many people will walk up to this


China Blossoms

and say, "Oh, look! She makes those little cup and saucer bird feeders." That just kind of leaves me shaking my head, because a: There aren't any cups, and b: These are flowers, held vertically on a stem, and won't hold anything. How is that going to work?

But I also began to think, Well, maybe they're seeing bird feeders because they want bird feeders, and not just because they expect them.

That kind of thinking can be dangerous, because it can lead to new ideas and then you have to act on them, and before you know it you're out in your shop making something you've never made before. Like flowers that can convert to bird feeders:


China Birdfeeders

Now, there are good reasons not to make the little bird feeders. First of all, around here it rains a lot, and these don't have covers, so after a rain shower, the bird seed can be kind of nasty. Second, if you're making a bird feeder, you have to use something in the center of the saucer that will actually hold something, and I like to mix it up, creating flowers of whatever looks good and ignoring functionality. Third, we also get freezing weather here, and any time you have an item made of layers of glass, it's going to hold rainwater, possibly in little crevices between the pieces. When the water freezes, it will expand, and if it's in one of those crevices, your garden art will be a shattered piece of garden junk.

This permutation, I think, takes care of all of that. I'll keep making China Blossoms that aren't anything else, and add these. In the summer, they can be set horizontally and hold water or seed for birds, or a votive candle to make a little fairy light outside. In the winter, when you still want to see something pretty in the garden, but don't want to risk breakage, you can leave them out, but set them on their stems vertically, so they won't hold water.

I'm pretty pleased with myself. And watching my little puppy sniff at the dress that just came from eBay. I'm curious, too: Will it fit? It came just in time for the 94 degree weather we're expecting this weekend, short, sleeveless, and black and white polka dots. Yay!