Monday, April 28, 2008

ALLISON STRINE--COLLAGE & WHIMSY

I have fallen in love with the art and whimsy of Allison Strine She makes me smile, and laugh out loud, and yes, WANT. (ooh ooh ooh--Three of her cards are on the way soon! YES!)

Let's see. Pictures first, and then interview questions, with more pictures, I think. (Thank you so much for letting me share, A!)


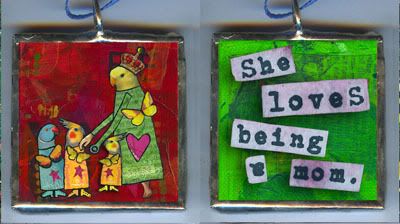
Is this All Moms, or not?


This one is SO my middle daughter!


And now the questions:
Where are you located?
I'm in the Atlanta area now, after having lived the first 30 odd (and they were odd) years of my life in Boston.


What do you create?
I make collages on thick art canvas, and then use the wonders of technology to transform the art into soldered pendants called LadyBirds. I also make soldered pendants/charms/baubles/doodads out of vintage license plate letters and fabric.


When and why did you decide to start your business?
I totally stumbled into selling my work. I had spent several years being very involved in the scrapbooking and altered arts industry, focusing solely on doing work for publication. I really loved seeing my work in print, especially in such highly regarded mags like Cloth Paper Scissors and Somerset Studio. After a while, I started feeling like I was losing myself, doing work that I thought editors might like, instead of listening to my art heart inside. So after a short art break, I whirled through a spurt of creating highly personal little figures that talked. Since they were part lady and part bird, I came up with the brilliant moniker of LadyBirds (I know, it's shocking, but true.) A friend mentioned Etsy as a possible outlet for me, and I started a little shop. It wasn't easy to shush the 'what-if-no-one-buys-them' naysayer inside of me, but I'm so glad I did!


Where do you get your inspiration for your projects?
Just about everything I come into contact with is fodder for my little art brain. For images, I love to use odd catalog stuff. The words are everywhere. My husband came up with one the most popular LadyBird sayings, when he started saying we should carpe the diem. Really, though, my life is one big fat ladybird.


Which of the tools you use is your favorite?
Ooh, whatever I'm using at any given moment is my favorite. When I'm soldering, I love the soldering iron, and when I'm painting, I love my paintbrush! I'm just a tiny bit addicted to my Mac computer, too.


Can you explain a little about your LadyBirds? What are they and how did you start making them?
I want to make art that tells my story without being a downer. I had a painful childhood, and developed an eating disorder as a way to cope with my troubles. O lo these many years later, I'm living the most wonderful life imaginable. I wanted to make art that helped remind me to live in the present, and not to revert to yucky negative thinking. I first started wearing a "She Dares to Be Happy" pendant, and it was good. Then I tried the "She Doesn't Pretend to Be Normal" pendant, to help me remember to be me, and it was good, too. Next, I tried the "She Goes the Whole Day Without Wearing a Bra", and the rest is history (kinda).

There are so many negative messages sent to women about our bodies, and it is important to me that the LadyBirds are made of all shapes, from massive silhouettes to pencil thin bodies, and of every skin color under the sun. I want to send my daughter a positive message about what it means to be a girl, and the LadyBirds help her to understand that she is much more than what others see on the outside.


What keeps you motivated?
I wonder about that sometimes. I may possibly have some (rather unattractive) obsessive tendencies. I'm sure I'd do some sort of art even if people hated it, but one of my greatest rewards is hearing from a customer that my piece had a positive impact on her day. Women have shared some really heartfelt, touching stories of being affected by a LadyBird touched them. That is without a doubt the most amazing reward of all.


How do you get the word out about your work?
So far, it's been word of mouth, and a little bit of advertising on blogs. Etsy has been an invaluable asset - there would be no business without the luck I've had on Etsy. The whole internet is just amazing to me; my mind is boggled by the fact that a lady in Tasmania can buy my work (and one did!). I'll probably do an art show or two this year also. I did one last fall and it was the first time I got to see people's faces light up when they read something that tickled them or spoke to them. I'll never forget that feeling of satisfaction, that my art actually made someone feel good!


What advice would you give to someone starting a creative business?
Ooh, I'd say it's important to listen to your heart, and make sure you're creating something that really reflects your own unique personality. And if it doesn't work, change stuff! Push yourself, even if it's scary as heck.


Who are some of your favorite indie artists/designers?
I'm new to the indie world, but from the altered arts world I'm quite inspired by the colorful work and generous spirit of Teesha Moore.

If you could live in your dream place/city where would that be?
I adore Hawaii, and Europe, and Boston in the summer, and San Francisco, and Maine, but really I just need to be wherever Lloyd is.


What's your definition of a perfect day?
I'm lucky enough to be living the perfect day right now (as long as the kids don't bicker too much). I like having my coffee, and bringing the kids to school, and calling Lloyd, and going to exercise (actually I hate it but I'm glad when it's over), and coming back home to do some soldering, and computering, and art-ing. And so on, until the cooking dinner part, which is the worst part of the day for me! But then it's over, and I'm happy again finishing up the day puttering around on the computer some more. Exciting, huh?

Thursday, April 24, 2008

MARTINI GLASS CANDY DISH

Mom didn't do this craft with me as it was getting late and she needed to go to bed, but she watched the first part of the process. Me, I thought I could just start on it, and kind of see how it was going to go, and then go to bed, leaving the rest until morning.

Ha!

It was well after midnight when I went to bed, but I left the finished candy/nut dish on the table for Mom to see when she got up.

It was fun to do, and simple, too. I used rubber cement to attach the music paper, and was pleased to find you couldn't see it on the inside of the dish. It was completely transparent when it dried.

I started applying the pieces of music, working from the stem to the rim of the glass. To make them fit around the stem, I cut a curved notch into the paper. As I looked through the music books I'd brought, some of the titles caught my eye, and I used a couple, adding a bit of humor to the project. Near the stem is the word "Prankish", and curving around higher on the glass is "Jennie's First Rondo", with a description below it: "not fast but very amiable and fine-tempered".

I found it easiest to apply the paper right out over the edge of the rim, and then trim it with scissors, which gave a nice straight edge. A glue gun worked nicely for the braided trim, bit of jewelry, and bead. On the chance that hot glue applied directly to the glass would crack it, I applied it instead to the trims, which worked fine. Last step was to tie a narrow black ribbon around the stem.

My photos aren't great. I think it was about midnight when I took the pictures, too!


Prankish


Jennie's First Rondo

Tuesday, April 22, 2008

Musical Notes Stationary

I mentioned in my last post that Mom and I had done a couple of crafts while I was there. We didn't get to as many as we'd planned, or hoped for. We're bad that way. We always think we have more time than we do. I guess that's why we usually do five days to a week, not the two and a half we had this time!

So we did one craft together, stationary made from old sheet music. It's an unusual design, a triangular envelope that folds over a sheet of writing paper that's attached to the inside of the envelope. Each letter is sealed with a sticker, in this case a bar or two of music.

Here are a couple of pictures:


Front of the Envelopes


The paper we used for the writing sheet was that old-fashioned erasable typing paper, and I really like that you can see the music through it. We tried the front of the envelopes both with and without the "TO" and "FROM" and decided we like the printed version better.

To make the envelope, just take a large sheet of music, and measure out a square, using the width of the sheet to determine the length of the four sides. Cut the square on the diagonal to make two right triangles. Measure the longest side (hypotenuse), and divide by three to find where to fold the side points in. Fold the top point down until it touches the V made by the other two points.

The sticker we made by cutting out a bar or two of music and gluing it to a mailing label. Next time, I think I'll glue the little bit of music to a black or red background to make an edging, and make the sticker stand out better.

I do like this stationary! Now I want to do a different type fold...

Sunday, April 20, 2008

Good Grief. SNOW!! (Photos)

Well, yesterday it snowed. I thought that was ridiculous. It does not snow here in later April. It just doesn't. Here are my Mom's poor pansies, shivering on the back deck:


Just to show me how silly my thoughts were yesterday, here's a shot from this morning:


A New Look for Cherry Blossoms


The sun's out now. The snow may not all melt today, but I should be able to make it home from Mom's. I've been near the Oregon coast all weekend, and we've had so much fun! (More photos, of our crafts, later.)

The drive home is through the Van Duzer corridor, but the snow plows (in April, for Pete's sake!) went by early this morning, and traffic is moving at its usual speedy pace.

Thursday, April 17, 2008

VEGGIES SO GOOD THEY'RE DESSERT!

I was browsing through the "Etsy Sellers Who Blog" ring this morning, but I didn't get far. Anything... snared me with the first entry on her page, a call for recipes!

How fun is that? I was on it in a flash, with a recipe for a vegetable casserole so good, it's original name has been lost. We just call it "Veggie Dessert". I swear, I think we'd all fall into dead faints if this weren't served at any and every holiday meal we sit down to. Don't be deceived by the Velveeta. This stuff is so good, even people who say they don't like vegetables come back for seconds. It's so good, one 9X13 inch dish of it is not enough, and Mom always makes a double batch. (Have I raved about it long enough? Too long?)

One warning: We estimate the calorie load at roughly a bazillion calories per bite. Here's the recipe:

VEGGIE DESSERT

Ritz Crackers
2 one-pound bags of California mix frozen vegetables, or similar
12 oz. Velveeta
2 cubes of butter

Spread the vegetables evenly in a 9"X13" pan. Melt the Velveeta with 1 cube of butter, stirring to mix well, and pour over the vegetables. Crumble one sleeve of Ritz crackers; sprinkle them over the veggies and cheese. Melt the other cube of butter and drizzle over the top.

Bake at 350 degrees F. for about 45 minutes, until vegetables are tender and top is nicely golden and crunchy.

Forgot to mention that it's really simple, too.

Wednesday, April 16, 2008

My Workshop (Photo)

I was looking for a certain photo a bit ago and ran across the folder that had pictures of my newish workshop in it. Dear Husband built it for me last fall, but I've used it very little, since it doesn't have heat. I love it, though, and now that spring is here, sort of (what lousy cold wet weather we're having!) I'm looking forward to getting out there again.

This is where I create the Coffee Pot People, China Blossoms, Tea Kettle Characters, and other garden art:


In other news, my morning has been seriously derailed. Not only can I not troop up and down the stairs, as I usually do, because DH is still working on the stair remodel (didn't like where they were!), but my cousin called and I spent an hour or two looking up vacation rentals for the Parker Ladies' Night Out, only to be told later we were going to just stay with the original. aaack.

Time to get myself back on track, so I think I'll head on over to Etsy. :o)

Tuesday, April 15, 2008

The Flip Book

It's a known fact: I'm ADD. Not frighteningly so, but enough to be obvious to those who know the signs--sometimes a bit over talkative; a bazillion passionate interests, each lasting at least several days, lol; and a woefully cluttered home and workshop.

I've been working really hard to remedy some of that, focusing partly on brain chemistry, through eating an ADD-friendly diet (lots of protein, not much in the way of carbs), and daily vitamins.

And I've brought back my old stand-by, The Flip Book. I read about it in The Messies Manual many years ago. (Hope I'm remembering the book's title correctly!)

You naturally tidy and organized people out there might want to stop reading at this point. You'll be rolling your eyes at what it takes to organize people like me in a few lines!

Here's how it works:

Get one of those little photo albums, the kind that have a transparent sleeve that holds one photo per page. Now get some file cards that fit the sleeves. Mine are the 4X6 size.

On the first card, put what you think you should do every day. Be careful! If you make this list too long, you'll abandon the Flip Book, because you'll be overwhelmed.
I have a double column, with a total of 14 items:

  • Dishes
  • Bed
  • Tidy bathroom
  • Pick up clutter
  • Exercise

WEB:
  • Relist: AM, Noon, PM
  • List 2 new items
  • Blog
  • Ship How's that for optimism?
  • Check Craig's List
  • Tend to email
  • Check Flylady.com
  • Attend to paperwork
  • Hang out in Etsy Forums (opt.)


After that card, you make one for each day of the week. You can have one, or not, for the weekend. I didn't put the weekend cards in, but am thinking I will. I want to have Sunday be the day I write to Paul, and it would be good to have the card, even if it were just for that.

The weekday cards have on them what you want to do weekly, and generally there aren't more than a few tasks on them. Monday's my day to do the laundry and deep clean the bathroom, Tuesday's the day to do the shopping, etc. I also have put on each day what art form I want to be working on.

Now you can put in cards, if you like, for things you'd like to do once a month, or seasonally. I don't have any of those, but may add them later. This is enough for me right now.

Lastly, sit down and make out three weeks of dinner menus. You can safely repeat any recipe every twenty-one days, and no one will get tired of it. I always leave a spot or two for a new recipe, or for picking up pizza, etc. On the back of your menu list, make a list of the groceries you need to make sure you have to create your list of dishes. Making out my list, I realized I'd gotten into a bit of a rut. We've had some darned good meals lately, and they were all things we always liked, but I'd forgotten about.

It takes so much stress away, knowing what needs to be done, and what you're going to fix for dinner!


My Flip Book and Menu list

Saturday, April 12, 2008

FOUND: FLOWERS BY FARHA

I met Farha last year, and went totally gaga for her silk flowers, made with hand-dyed silk. And isn't it great when an artist you admire for his/her talent turns out to be nice, and a fun person? Makes me glad she's local to Portland, and not just on Etsy. Not that there's anything wrong with being "just on Etsy." Besides, we all live somewhere, right?

Here are some things from her Etsy shop. I can't, of course, show everything here, so you'll have to visit her yourself at www.flowersbyfarha.etsy.com.

This first flower just wowed me. It looks like something you could frame and hang on the wall:


A fairy hat! I am in love with this, naturally. I don't just love fairies, I happen to know for a fact that they are real.


This gives me that Ooh-aah feeling. Beautiful.


Isn't this one lush?


Just one more delicious dainty:


By the way, you won't see all these on Etsy. Check out Farha's website, where she has dozens in the galleries: www.flowersbyfarha.com

And there's more to see (and buy!) here: Flowers by Farha on Silkfair

Friday, April 11, 2008

REMOVING THOSE !@#$! LABELS

This is just a quick tip about something that's irksome to me, and probably to others, too: Ninnyhammers who stick paper labels to paper goods. I'm practically growling, just thinking about it.

I've ruined things, trying to peel the labels off. I've passed on buying things I wanted, because I was afraid removing the blasted label would peel off some of the paper, too.

Then, a couple of years ago, I tried something that actually worked. HEAT.

Get your blowdryer out, turn it on high, and hold it close to the label. When the label has heated up, gently pry up a corner or an edge, and peel back. It will lift off, usually not even leaving an adhesive residue.

This comes with a caveat: Be careful of your fingers! It takes a lot of heat, and you can't just heat up the label and then put the dryer down. Won't work. Be quick, or use pliers.

On a magazine cover or other flexible item, you can do what I (duh!) figured out today and heat the back of the paper, keeping that blast of superheated air away from your fingertips.

And that's the handy dandy tip for the day, and quite possibly for the week.

Thursday, April 10, 2008

FOUND: MY ORPHANS

Saw these on Etsy the other day, and have been wanting to put them here ever since, but you know how it is--life will intervene, and that's a good thing. You can find more of them at MyOrphans

Aren't they great? Makes me want to adopt a bunch!


Andy


Little Lamb


Winter Dreams

The little lamb is a birth announcement/gift, and comes with a tag you can't see in the photo I'm chosen: "Oh, my goodness! It's a girl!", or boy, depending.

Monday, April 7, 2008

FOUND: FRUCCI DESIGN

FrucciDesign had an item on the front page of Etsy yesterday that completely captivated and fascinated me. I wanted to show it, and a bunch of others off today. It's my "Ohhhh, wow" moment for the day. It was almost painful deciding what to show, because of what I'd be leaving out, so be sure and visit her shop at FrucciDesign.

Here's the photo that snagged me:


Oh, my. What IS that?


I followed it to this one:


They're origami pendants!


Here's a singleton:


Well, I have to say, reading that they were origami sent me out into the Wide World of the Web, where I found out these are assembled from single units of paper called sonobe. One website said the modules were easy to make, but assembling them into structures? Not so much. I can well believe it.

I think the sonobe units Frucci uses must be a variation. They do remind me of the gum wrapper chains we used to make when I was a kid, but ever so much cooler.

A few links, for sonobe origami:

Sonobe Instructions for Polyhedron
Sonobe Cubes, etc.
British Origami Society

A few more photos from FrucciDesigns:


Pearl and Paper Ring


Paper and Copper Cuff Bracelet


Thanks, Fru, for letting me share your work!

Saturday, April 5, 2008

BOOK INTO BOX, PT 3

The cavity in the book is now hollowed out, as much as I want it to be. That presented me with a choice: decorate the inside of the book box, or the outside.

I still haven't quite figured out what I'm doing inside, and I had come up with some ideas for the outside, so the choice was logical, for me, anyway. (An even more logical choice might have been to do housework, but faced with the options of art and housework, there needs to be some pressing need for sudden tidiness to compel me to choose cleaning over creating!)

A number of possible styles had occurred to me, all of them radically different. Elegant. Country. Cute. Vintage. Very Vintage.

Ah. Vintage. They've been doing wonderful things in Somerset Studio Magazine, including the controversial Hats and Wings collage art. There are people who have "issues" with adding hats and wings to images and calling it art. I call it fun, and since it had been in my mind I decided that was the route I'd take decorating my new Book Box.

Yesterday, I painted the book. You might want to prime your book cover with gesso, but I liked the aged forest green of mine, so I dry brushed a coat of navy over it, letting the green show through a bit, and when that was dry, adding another sparse coat of paint, this time black. My plan was to wire brush through to the green when I was done with the collage.

Don't you love happy accidents? I discovered when I did the wire brushing that the brass bristles left traces of themselves behind, making the book look like it was brushed with gold.

This morning I got up eager to create the collage.

I pictured a 1920's or '30's black and white photo of a matronly woman, maybe sitting on the porch or looking out the window of an old, decrepit, even spooky, house. Dark, possibly a little forbidding.

Accordingly, I first went into the music room, where I had some old Etude magazines. I knew there'd be photos of opera singers. That would be good. Then I went down to my office and gathered up all the back issues I own of Communication Arts. Their annual Illustration and Advertising issues are wonderful, crammed with all kinds of pictures, in every genre imaginable. I'm constantly on the alert for them at garage sales and in thrift stores.

Well, the first thing that happened was I fell in love with a guy's face and expression. The matron went out the window, along with her house. The man grew wings made from palm fronds and flamingo beaks, and sprouted a tall pointy hat. Then he acquired a lovely wife. And indulged in conversation.

Did I say dark? Did I say forbidding? Art knows what it wants. Or else, I'm just a bit demented.


No protective coating yet, but finished design


I'm a big fan of rubber cement. It's so forgiving if you "glue outside the lines", but found it was not as sticky as I'd hoped, so next time I'll try a different glue. (Open to suggestions here.)

When you've laid out all your design elements and are sure you know where you're putting them, you can begin to glue them down. Things that are multi-layered, such as Finkydoodle's hat, which has five pieces, you may want to glue together and then add as a unit.

Here are two detail shots:


Can we talk?


What do you mean, is that what I'm wearing?


Next and final step: Finishing the inside of the Book Box.

Friday, April 4, 2008

SAVE MY SHOES!

I'm trying to get organized. Do you know how hard that is for an ADHD person?

Well, it does have its upside. I get a lot of things done, many of them unexpected.

For instance, yesterday I set my favorite pair of casual shoes next to the front door, preparatory to removing the shoe laces and throwing them out. (You'll see why in a minute.)

One of my goals today was to get the entryway and porch tidied and swept, so this afternoon I walked over to the front door and picked up the shoes. I had every intention of carrying them out to the dumpster, and then sweeping the floor.

Dang. I just couldn't do it. I know they're cheap shoes. Cheaply made, and bought even more cheaply, at the Goodwill, but they're really comfortable. The soles are soft, and even with that leg-lengthening heel, they feel good, and they let me run. (Yes, I am often too impatient to get where I want to be to walk.)

I started to pull the laces out, but I was thinking, There just has to be something I can do with these shoes. I don't want to give them up!


See how the toes are peeling? That's all that's wrong with them.


I carried them over to my sewing table, and started rummaging through the fabric samples. Maybe I could cover them with soft fabric. Then I spotted the zippers on the table.


The germ of an idea


I'll just show with photos what I did, because it's late, and a picture is worth a thousand yada yadas.


Marking the spot


Now the other side


When I was finished, this is what I had. I think I like them even better now!


Wednesday, April 2, 2008

BOOK INTO BOX, PT 2

Yesterday, I dug into that hardcover catalog with a box cutter and enthusiasm, and continued that task this morning.

Here are some additional thoughts on the hollowing out process.

Books are able to open because the pages slide against each other. We're going to glue the edges of the pages, which will make a nice solid box with pages that no longer slide. That means that your hole will need to start right at the front of the book, or within a few pages. The front cover will be your box's lid, and with only a few pages, or none, glued to it, will open and close easily.


The pages slide against each other

You can follow the margins of the book for your hole, or, as I did without thinking about it, you can make one margin wider. That would give you a place to put a title or additional decoration inside, or even room to cut another, smaller hole.

I've considered both options, and thought about what I'd use the smaller hollowed out compartment for. I could create a stash for an ink pen, and put a note pad in the larger one, or I could cut a rectangle the perfect size for the watch Grandpa gave Grandma when they got engaged, nearly eighty-five years ago. As you can tell, there are all kinds of things you can do with the extra space inside the book.

Now for the next step. If you haven't protected your work surface yet, this is a good time to do that.

You want to solidify the sides of the box. What you'll need to do that is glue and water. I used wallpaper edge glue because that's what was handy, but any kind of water-based household glue will do the trick. You're going to paint the glue on the outside edges of the pages, which is why you need water. The glue needs to be thinned enough to do that.


What's needed for this step


Pour a little of the glue into a small bowl, and add a little water. I use a table knife to mix because I can scrape the blade on the bowl's edge. Put enough water in the glue to make a liquid that will paint easily with a soft brush


Painting on the glue


but not too much. Glue that is too thin will make the paper buckle.


Warped edges from over-thinned glue

As you can see, I had a little problem with that. If it happens to you, don't despair. The next step is to weight the book down. I used a concrete paver. If your weight is something like that, put newspaper between it an the book, to protect it. (The book, not the brick!) I sat it on top of the closed book, but its weight alone wasn't enough to take out the buckling, so I gave it several hard pushes down with the heel of my hand. I felt like I was giving the book CPR, but that did the trick! Still, it wasn't quite as smooth as I wanted it to be, so I gave it a few swipes with a small wire brush. It looked all right even without that step, though.


Squashed, compressed into its former flatness


Leave your book to dry, and go do something else. Suggestion: Start thinking about how you want your finished book to look, if you haven't already started. That's our third and final step.

Tuesday, April 1, 2008

BOOK INTO BOX

I decided to try a new craft this morning, one I'd seen and thought might be both interesting and fun. And then I decided to photograph the process, so if I get it right others will know how. If I get it wrong, I guess the world will see what not to do! (Can you tell I'm operating without a compass? I've seen the finished project, but no directions for getting there. Still, how hard could it be?)

So the first thing I did was get a book I didn't mind destroying. For me, that happens to be a 1964 Chilton's parts catalog, nice and big, and thick, and probably completely useless to anyone.

Then I got my scissors, and opened them up, and began to scribe a line on an interior page with them, using the edge as though it were an Exacto knife. I was sitting at the dining table with Bob at the time.

"What in the world are you doing?" he said. I told him, and he gave a disgusted snort and went into the bedroom, returning with a box cutter, which he opened and handed to me.

That's the tool to use, if you have one. A box cutter.

I suppose I should say that step one in the process is to cut a deep rectangle from the inside of the book. The hole you create is the inside of the box.

My goal is to have nice, clean, interior edges/sides, so I next got myself a straight edge. In true Anitra style, I either don't own a ruler, or I can't find one. The three-hole paper punch worked just fine. In fact, it has the advantage of being considerably thicker than a ruler, and I don't have to worry about cutting me. It's also metal, so I don't have to worry about cutting it. Perfect. From a certain perspective, anyway.

Pictures of the process:


The book and tools


Some pages have been cut out


Some of what you end up with, besides your new box


I didn't realize two things when I started. The first was how nice it was to have the lines and edges right there on the page, to cut along. I suppose, though, that any book you use would have very clear margins. Cut along the margins and your boxes edges will be uniform.

The other thing I hadn't thought about was that the pages were kind of cool, taken as patterns or images. If you were scrapbooking or collaging something with a male theme, these would be great, so I'm going to save some of them for future use.

More later! Today is the first day of the new tag sale at the Seventh Day Adventist Thrift shop and I want to get there before those twenty cent t-shirts are picked over!

Related Posts with Thumbnails